
By Damon Leedale-Brown, Sports Scientist & Conditioning Specialist
In the last article we discussed Level 1 of our Core Training progressions, and outlined a series of simple bridging exercises designed to correct and improve the mechanics of hip extension movements which in turn helps prevent unnecessary forces being directed through the lower back. We will now move on to Level 2 and consider a series of 3 exercises that are designed with the primary goal of improving stability of the spine while at the same time avoiding the excessive loading of the spine which is typical of many poorly chosen and executed gym exercises.
Level 2—Developing whole body and joint stability
For many squash players this should include improving mobility in key joints such as the hips while developing stability and control through the lower back and core regions. From my experience this is crucial for efficient movement and long term back health on the squash court. Players who have significant movement restrictions through the hips will nearly always compensate by creating this movement through the lower back. The lower back will only tolerate this imposed repetitive stress on the squash court for so long before breaking down.
To effectively train the stabilizers of the lower back (lumbar spine), Stuart McGill (Professor of Spine Biomechanics at the University of Waterloo) was able to quantify a range of different exercises and, from these, selected three basic forms of exercises (which they called the “Big 3”) that are effective at developing stability for the spine.
1. The Curl-Up
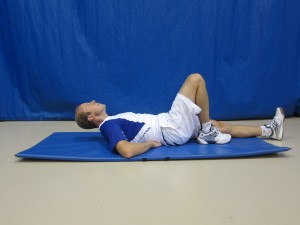
The most important aspect to understand about the curl-up is that it is not really a curl-up at all if done correctly! For the curl-up, start with one leg bent and the other leg relaxed on the floor. Use the hands to help support the lower back region—the goal is not to flatten the lower back to the floor. While keeping the elbows on the floor elevate the head and shoulders only a short distance from the floor (figure 1). The focus of any movement should be from the thoracic spine (mid-back) and not from flexion of the cervical spine (neck) which is poor technique. Hold the elevated position for 2-3 seconds and then return to floor. Start with 2-3 sets of 10 repetitions and gradually increase sets and repetitions as you adapt. Repeat with the opposite leg extended/bent.
2. The Side Bridge
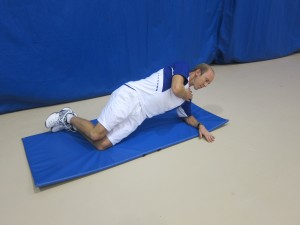
The side bridge is a great exercise for activating many areas in the abdominal wall including the obliques (the side of your torso). Spine loads are generally kept low with good technique, and this is a much safer exercise for the lower back than twisting curl-ups. The level of side bride you start at should be based on your individual capabilities, but I recommend that everyone initially start at Level 1 to develop good form and understand how to perform this exercise correctly (see figures 2-5).
In Level 1 start on your side supported by your elbow and hip with the knees bent at 90° and your free hand over the opposite shoulder to help stabilize it. Then straighten your torso until your body is supported by the elbow and knee with some support from the lower leg and the hand on the floor. Progressions are made with the upper arm placed along your side, and then into position with legs straight with the upper leg / foot placed in front of the lower leg / foot. With all levels of the side bridge hold the position for sets of 10 seconds and initially look to increase number of sets rather than duration (i.e., start with 2-3 sets of 10 seconds and build towards 5-6 sets of 10 seconds).

3. The Birddog
The superman is a common back extension exercise that you may have seen done in your local gym. The athlete lies on their front and then with hands on the side of their head lifts the chest and head away from the floor while at the same time trying to lift both legs away from the floor. This places high compressive loads on the spine due to the extended position of the back compared with the Birddog exercise (figure 6) which is much more tolerable. When performing the birddog exercise ensure that no motion occurs in the spine as you extend one arm and the opposite leg. Hold the extended position for 10 seconds and then repeat after a short rest. Start with 4-6 sets of 10 second holds, alternating the arm and leg position each set.
These three exercises, if done with attention to perfect form, should provide a great foundation in developing stability for your lower back, while minimizing the potentially damaging forces to your back that are typical of many common gym exercises designed, in theory, to achieve the same objective!
In proceeding articles we will begin to look at effective exercises for developing torso and lower back strength for the squash player.